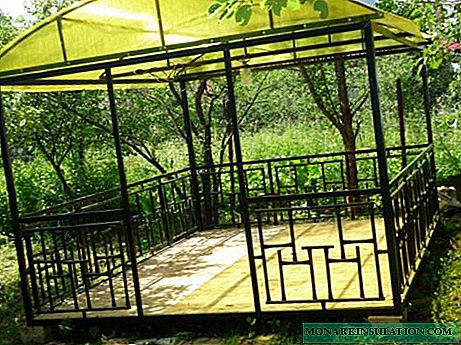
On a hot sunny day, when the walls of a country house are thoroughly warmed up and do not give the desired coolness, many of us often have a desire to find a place to relax in the fresh air. A good solution for arranging such a cozy corner in the open air will be a gazebo made of metal with your own hands. The graceful design will not obscure the picturesque landscape or view of the house and will become an organic complement to the architectural ensemble.
Beautifully designed metal gazebos for summer cottages, acting as an aesthetic complement to landscape design, are able to emphasize the taste of the owner. The variety of shapes and sizes of metal garden gazebos is amazing. Traditional round, square, hexagonal and octagonal arbors, as well as original designs of the most unusual design solutions, become decoration of suburban areas.

Depending on the designer's intentions, the arbors can be decorated with a wide variety of decor elements: art forging, hanging flowerpots with ampelous flowers ...
The main advantage of arbors for giving from metal is their strength and durability. Convenient designs are able to regularly serve more than one season. The only thing required to extend their service life is to periodically inspect and clean the areas where signs of corrosion have appeared in a timely manner.
The rigidity of the frame of metal arbors allows you to prevent changes in geometric dimensions, which often arise due to uneven subsidence of the soil under the influence of seasonal changes.

Depending on the design and functional purpose of the gazebo, any attributes for relaxation can be set on the covered area, starting with garden furniture and ending with barbecue or barbecue stove
There are also many options for decorating a metal frame roof: slate, metal profiled sheet, polycarbonate ... The choice is limited only by the owner's preferences and material capabilities.
Pergolas can be a stationary capital structure, or portable temporary structures. In the first case, they are installed on the base: slab or column foundation. Portable structures, which are easy to dismantle and remove with the onset of cold weather, are installed directly on the ground.
A self-made metal gazebo is at least a reason for the pride of its owner. Therefore, we propose to consider the main stages of the construction of a construction so needed in the economy.
Step-by-step construction of a gazebo with a multifaceted roof
The hexagonal gazebo is a classic that has not lost its relevance for several decades. Such a cozy design has a number of undeniable advantages, the main ones of which are: elegance, spaciousness, strength and ease of construction.

Such an octagonal or hexagonal construction is analogous to a round arbor model, but unlike the latter, it is much simpler from the point of view of construction
There is nothing complicated in making a metal gazebo yourself. To do this, you only need to have a specialized tool and have minimal plumbing skills.
Step # 1 - preparing all the necessary materials
To make a metal gazebo you will need:
- Hollow pipes with a wall thickness of 2-4 mm for structural posts (rectangular or square section);
- Mounting brackets;
- Bars for lathing;
- Roofing material (wave polycarbonate, soft tiles ...);
- Wall paneling;
- Kolovorot or garden drill;
- Electrodes
- Drills for metal;
- Building level;
- Sand and cement;
- Paint for metal.
Among the tools we need: a grinder, a welding machine, a puncher or an electric drill, galvanized self-tapping screws and a screwdriver.
Step # 2 - choosing a place and preparing the foundation
The main condition for choosing a place for arranging the gazebo is for the owners and guests to feel cozy and comfortable here, admiring the most beautiful views in the summer cottage.

Any place for arranging a gazebo on the site can be chosen: under the canopy of trees in the garden, near a reservoir or near the entrance to the house
Thinking over the design of the gazebo, you need to decide for yourself whether it will be open, blown or closed, with or without lighting. To visualize the project and determine the dimensions of the future design, it is desirable to make a drawing of the building. The drawing, made to scale, will correctly calculate the required number of pipes for installing the main frame, and additional couplers of a smaller cross section for arranging the roof and cross-beams.
Determination of the dimensions of the doorway:
- height is calculated based on average human height (1.8-2.0 meters);
- the width of the opening is approximately equal to the standard size of the door to the apartment (0.9-1.0 meters).
We clear the area chosen for arranging the arbor from debris and tree roots.

From the site cleared of debris and plant debris, remove the fertile soil layer, which we use to pour into the flower beds and even out differences in the area
After clearing the site and removing a 15-20 cm layer of earth, fill the bottom of the "foundation pit" with 5-8 cm of sand, pour over it with water and carefully compact it. On the basis of sand, you can simply lay paving stones or paving slabs, or build a concrete platform. To do this, form the formwork from the boards, fixing it with pegs driven into the ground on the outside. We fill the site with concrete and leave it to solidify for several days.
When arranging a site with an area of more than two square meters, it is necessary to provide for temperature shrink seams. For this, we set the formwork boards, maintaining an interval of 1 meter, and fill the space with cement mortar. After the concrete has hardened, we remove the boards, and fill the cracks and voids with a liquid solution.
Step # 3 - installing the support posts
After the completion of the floor arrangement, we set marks on the perimeter of the site where we will place the support posts. The number of racks should correspond to the number of corners of the gazebo.

To erect the support pillars in the designated places with the help of a rotor or garden drill, we dig holes with a depth of about 80 centimeters
It is advisable to deepen the support posts below the level of soil freezing, which ranges from 80-100 cm. We fill the bottom of dug holes with a layer of sand and gravel. In the center of the holes we install metal poles. Using the level, we determine their verticality, and then fill the voids with cement mortar.
Another option is the construction of racks, in which in the designated places at a depth below the level of freezing of the soil a columnar foundation is installed - concrete columns with embedded ones. Metal pillars-supports will be welded to these mortgages.

After installing the vertical posts, horizontal cross-pieces can be welded to them, which can be played by metal pipes or rods
The veins are placed in two rows, the width between which is 1.2-1.5 meters. They will be subsequently fastened to the skin (boards, lining, polycarbonate).
The metal structure can be assembled using screws and bolts, as well as by welding. The choice depends only on whether the owner knows how to work with the welding machine or whether he has the opportunity to invite an experienced welder. The main advantage of the bolted connection is the ability to dismantle the structure for winter time. But at the same time, do not forget that during the operation of the structure, bolted connections will have to be constantly tightened.
Step # 4 - arranging the hexagonal roof of the structure
So that water flowing from the roof does not flood the structure, we place the transverse logs so that they exit 50 cm from each end.

To equip a regular octagonal or hexagonal roof, we weld the transverse beams to the supporting posts, placing them at a distance of two meters from each other

Logs are welded to the metal cross members, and then, guided by the level, we attach and fix the rafters
The simplest option for arranging the roof is lining with polycarbonate sheets. For this, we make holes in the metal rafters for attaching the roofing material. To correctly expose the first sheet of the roof, we stack two sheets, according to them we calculate and set the desired angle and offset. After that, we remove the first sheet, and fix the second on the screws. We fasten all the roof sheets in turn, to give rigidity by fastening them together through two waves.
Video examples of the construction of other structures
Example # 1:
Example # 2:
The gazebo is almost ready. It remains to attach the side panels and paint the metal elements of the frame. You can paint the finished structure by applying a powder coating. A good result is given by the traditional version of painting, in which a layer of soil is first applied to the surface, and then paint on the metal.