Even at the stage of acquiring a cottage, I decided that there would be no standard garden on it. Maximum - a few beds with greens. But potatoes and tomatoes can be purchased on the market without delving into the ground from morning to night. And what to hide: many vegetable crops, the same cucumbers, tomatoes, melons, by the middle of summer do not look too neat. Bare stalks, yellowing leaves - I've already seen enough of this from my neighbors. And I wanted the site to bring aesthetic pleasure, and without any garden exceptions.
The whole year after buying a cottage, I dealt with planning problems. Slowly planted flower beds, made paths, in general, comprehended the basics of landscape design in practice. Looking at my sophistication, my husband periodically reminded that we do not have everything, like people have. And it would be necessary to plant at least parsley and onion. Since by this time I had more than enough knowledge of landscape art, I decided to make my husband pleasant. And to build a garden. But not simple, but decorative - with flower beds, planted with plants that are able to maintain a decent appearance throughout the season.
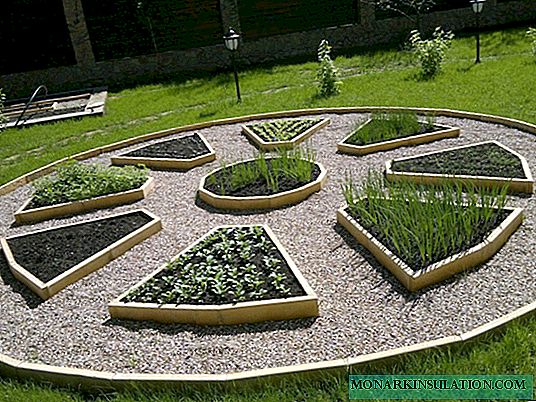
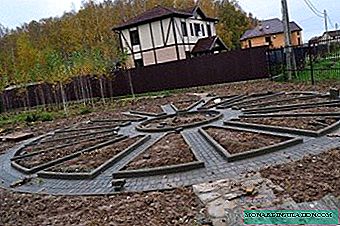
Layout of my decorative garden
She promised - that means it needs to be done. I opened the Almighty Google with its pictures and found many photos of decorative gardens. Immediately swept up the raised rectangular beds, standing in a row - not interesting, as for me. I decided to make some kind of composition, with meaning. And now, on the Internet, I saw a wonderful photo of a raised flower garden in the form of the sun. In the center of the ensemble there is a raised round flowerbed-sun, and triangular elongated flowerbeds-rays depart from it, their borders are outlined by borders. Inside the beds - mixed planting of flowers and garden plants, mainly greens. Greens grow very quickly, seeds can be sown in any season, young plants reach maturity in just a couple of weeks.
And so I got the idea to create such a garden-sun. At first I planned everything on paper. The paths between the clubs will be laid out from pavers. The width of the two circular paths is 60 cm, the radial ones are 40 cm. The diameter of the inner circular flowerbed is 280 cm. At a distance of 60 cm from it, 16 sectors of rays will be diverging, 300 cm long. The smaller side of each sector is 30 cm, the large - 150 cm. Concrete borders will be used to frame sectors and the central circle. With their help, it will be possible to achieve geometrically accurate shapes and sizes of garden sectors, as well as to make possible their "elevation" above ground level.
I must make a reservation right away that I decided to delegate the work to the creation of raised sectors and paths, laying curbs to a team of builders. I assigned the role of organizer to myself; I, naturally, will plant the plants in the garden myself.
Formation of sectors of a decorative garden
We were lucky with the hired team. They worked so smoothly and quickly that there was nothing to complain about. During the day, we marked out all the elements of the flowerbed, dug up the sector-rays and dug concrete curbs.

Segmented beds in the future decorative garden
I wanted such a border to serve if not all my life, then a couple of decades for sure. Therefore, the choice fell on concrete. Honestly, I was afraid that the frame would look bulky, but as a result the composition turned out to be pretty.
The sizes of the curbs are 20x7 cm, the length is 50 cm. When installed, they were buried at half height, that is, 10 cm. The remaining 10 cm protrude above the level of the tracks. Since many elements are semicircular, the curbs had to be cut on a stone-cutting machine, at an angle, and then joined to the corners.
Lands were additionally poured into the inner framed space of the flower beds so that the surface was elevated.

Concrete borders are laid around the segments.
The picture is already looming! You can start the tracks.
Creating paths between beds
I thought for a long time what to make tracks from. The requirements for them are: the ability to safely move, decorative and durability. The first thing that occurred to me was not to strain and cover the whole thing with mulch from decorative wood chips. It seems beautiful and useful and convenient. Weeds do not germinate through the mulch; the powder looks neat. But then I thought that you couldn’t walk along the mulched paths after heavy rains, there would be dirt. And you’ll have to add mulch from time to time. Another option is to pave the tracks. Difficult, also not suitable. But paving with paving stones - just right. On this and stopped.
She gave instructions to the workers and they set about creating tracks. The technology is as follows:
- Trenches are dug out along the marked outlines of the tracks. You need to dig up to clay, that is, removing the entire fertile layer. In our case, to a depth of 15-20 cm.
- The bottom is lined with geotextiles so that the powder that will be on top does not seep through the ground. Otherwise, paving stones under pressure can sag, change the angle of inclination.
- It is poured in layers on geotextiles: sand - 5 cm, crushed stone - 5 cm, sand again - 5 cm. The thickness is approximate, you can vary, depending on the situation and your own eye.
- Sand-gravel pillow is spilled with water from a hose to get completely wet.
- The pillow is sealed with a roller so that there are no traces left on the offensive. With insufficient compaction, the sand will sag over time and the paving stones will stagger on it, and then completely fall off. Ramming is an important part of the job!
- A mixture of sand and cement is poured on top - about 3 cm in height.
- Paving stones are placed on this mixture, each element is driven in with a rubber sledgehammer.
- The joints between the pavers are sealed with sand.
All of the above actions were completed, after which the beds for my decorative garden were ready for landscaping. I opened a field for landscape experiments!
Paving paving paths between garden beds
Gardening of a decorative garden
Unfortunately, it was already autumn in the yard, the season was ending, so I decided not to do gardening in the first year. And already in the spring I bought on the market bushes of wild strawberries and planted half of the ray sectors (8 pcs.) With them. The remaining sectors so far covered with black non-woven material ("Spanbond") so that the weeds do not grow and spoil the appearance of the garden.
In the central flower bed I will have a flower garden, so I settled there 3 stem-shaped lilacs "Palibin", dug up a few peony roots and planted geicher bushes. For bright spots along the great circumference of the sun, bushes of an ever-flowering pink begonia were planted. I bought ready-made flowering seedlings in the greenhouse, where it costs quite inexpensively. It is a pity that begonia does not tolerate our winters, every year, if you want to keep the composition, you will have to buy new bushes.

Strawberries in a decorative garden bloomed and gave a good harvest in the first year!
I admit, this year I was very busy landscaping other parts of the site, so the garden came to my foreground. And he stood, half-covered with covering material all season.
But next spring I, with an already prepared planting plan, started sowing. I planted various salads, carrots, onions, beets, parsley and dill in the flower beds.

I mulched the earth in a central flowerbed with decorative chips
A very important event when caring for a decorative garden is watering, preferably in the heat every day. Without organized regular wetting, you will certainly get a crop. But you can forget about the beauty and bright juicy greens. If you visit the cottage only on weekends, then the best way out in this situation is to organize drip irrigation. I have hoses stretched along the beds; water is supplied to them from the storage barrel.
The main thing is not to water the plants from above during the day when the sun is shining. Otherwise, burns will remain on thin leaves. If watering from above (for example, using a circular sprinkler), then only in the evening or in cloudy weather. A decorative garden is not quite ordinary beds, it is a kind of flower garden, but only for vegetables and greens.

Peonies and lilacs bloomed in the central flowerbed
In early June, the entire garden sun was greened in different shades, peonies and lilacs bloomed, and the leaves of the heicher blossomed. My heichers are different - with green leaves, yellow, crimson. They are planted on the rim of a round flowerbed in the center, frame a composition of peonies and standard lilacs. In general, a flower bed makes such an unusual color in a decorative garden, dilutes the colors of green with its bright colors.
At the same time, despite the fact that in the segments-rays planted one green, each culture has its own shade. Oak salad - brown, lettuce - light green, onion - dark green. Parsley is carved, dill is fluffy, and in summer it also blooms with yellow umbrellas. Everything is so different that the garden looks not at all boring, not monotonous.

The greenery grows very quickly, so already at the beginning of summer the decorative garden looked like a full-fledged flowerbed

Different shades of greenery in a decorative garden make it bright

The riot of a decorative garden in the middle of summer - the greenery has grown and closed all the voids, dawned bloomed
Of course, for the next years I will change everything, mix, maybe I will plant flowers on the contour of the beds to the greenery. In the meantime, I like everything and so. This is a very unusual and pleasant feeling when you realize that all this beauty, which blossoms and turns green, is up to you. And, thanks to my own work, it turned out to organize not ordinary beds, but a designer vegetable flower bed. Perhaps my achievements will help someone to equip their decorative garden. Go ahead and you will succeed!
Irina