Unusual things attracted people at all times. And if living trees take amazing forms, then nobody will pass by such beauty indifferent. One of the jewelry trends in landscape art can be called arbosculpture - growing trees in the form of armchairs, geometric shapes, ornate ornaments and even people. But do not confuse arbosculpture with topiary and bonsai. These are three different techniques, and what is the difference between them - we will look at specific examples. In addition, the simplest forms of arbosculpture can be created by any summer resident who has the patience and patience to form, vaccinate and care for his sculptural trees.
Arbosculpture is not a new direction. It was invented in the second half of the 19th century in America. But until that time, trees grown using the technique of arbosculpture are rare in Europe, and even in the countries of the former Soviet Union they are considered exotic. So if you want to surprise all your friends and acquaintances, try creating at least one tree in this technique.

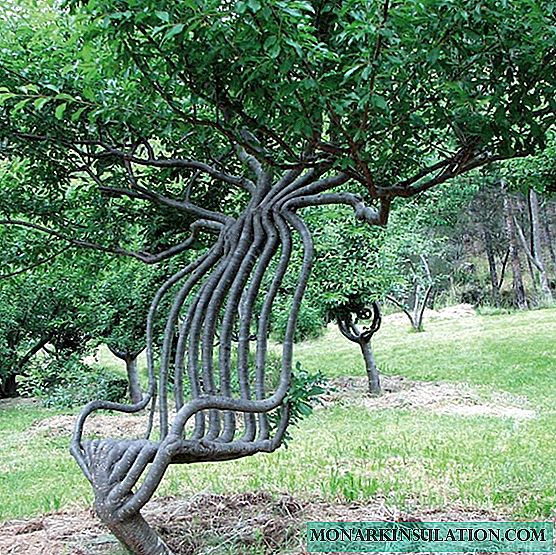
Not only guests will like to sit on such an original armchair, but also their own children, who will make it the main object for games
The essence of arbosculpture is to give it bizarre shapes during the process of growing a plant by curving the trunk, forming branches and, if necessary, grafting. At first glance, the technique looks like a bonsai, where there are also curved trunks. But bonsai is the art of growing miniature trees with full preservation of the signs of the big. And in arbotekhnika specially bend the plant, giving it an unnatural shape.
Different forms can be given to cultures using the topiary technique. But in this case, the original forms and figures are obtained due to the constant cutting of foliage and thin twigs. And in the arbosculpture, the leaves do not touch. The gardener's task is to transform the shape of the trunk, to bend the skeleton, until he has time to lignify. Moreover, you can experiment not with one seedling, but combine 3.4 or more trees into one ensemble. Their trunks are joined by grafting, and the trees themselves heal the wounds, tightly growing to each other and forming scars-growths at the junction.

Vaccinations are used when creating a sculptural composition of several trees, and the shape of one plant is changed by bending the trunk and branches
What trees are suitable for arbosculpture?
In order for the tree to endure steadily all the troubles the owner will expose it to, it must first be adapted to the climate of the area. So from the most ordinary birches, mountain ash, maples and bird cherry it is easiest to create sculptural masterpieces. Fruits also tolerate molding well, but they will begin to produce crops a little later than usual: not in 4-5 years (apple tree), but by 7 years.
It’s better to start mastering a new technique with willow or plum. Both of them grow quickly, take root well and do not require special care. If you buy a tree in the nursery, then you must immediately find out from which edges it was brought. It is better that it was grown on domestic lands.
A complete list of trees that are easily bent can be found in the bonsai encyclopedias, as this technique has gained much greater popularity and, accordingly, is more broadcast on the Internet. True, pay attention to the fact that it is trees that are needed for arbosculpture, while low-growing shrubs also expose bonsai.

You can create such a table from any large tree, such as linden, maple or even fruit crops, grafted onto dwarf rootstocks
Where to start: simplest forms
The simplest version of arbosculpture is a tree whose trunk is curved in a zigzag pattern. In order to get such a miracle, you must:
- Buy sapling with a flexible trunk. (Check at the time of purchase by slightly moving the trunk to the sides. If the trunk has time to lignify, look for a younger seedling).
- Plant the plant not vertically, but at a certain angle (up to 30 degrees) so that it takes root already with a bend.
- Try to tilt the crown of the tree and find the place where it is best bent. Most often this place is in the upper, youngest part of the trunk.
- Cut all branches below the bend point into a ring (right next to the trunk, without stumps).
- Of the two sticks, knock down the cross-shaped support so that it is 10-20 cm higher than the seedling, and the point of intersection of the sticks falls to 1/3 of the top of the support.
- Dig a support into the ground so that the trunk is approximately centered between the sticks.
- Tie a seedling to one stick, starting from the bend point of the plant and to half the remaining part. Bend the rest of the top in the opposite direction and tie it to the second stick, which goes at an angle to the first.
- If the plant is too small, bend it only in one place and wait a couple of months until it grows in this state in order to be able to repeat the bend.
Trunks can be bent only in spring and summer, when sap flow has begun in the tree. Up to this point, the seedling is not flexible and can crack when tilted.

The bend angle of the trunk can be varied using a cross-shaped support, pushing its parts further or closer until the tree is fixed
All skeletal branches located above the first bend of the trunk must also be formed. To do this, the strongest branches are left on the tree and give them an angle of inclination, hanging weights at the ends. If you need a strictly horizontal line or a precisely specified direction, horizontal rods are nailed to the main support at the points where the branch departs from the trunk, and the middle and edge of the branch are tied to them.
When you see that the trunk and branches are coarsened, solid, you can remove the supporting frame. The bends of the trunk can be created in this way as many as you like, changing the supports to higher ones.
Sculptural vases from fruit trees
To fruit trees fit into the landscape, you can improve their shape by creating a vase, flower, goblet, spiral, etc. from the trunk. In this form, they will be decorative at any time of the year. It is not difficult to make a sculptural masterpiece, but you will have to form a crown for several seasons.
Step 1. Create a wireframe
The first thing they think about is what shape the tree will be. We recommend starting with a vase. To do this, weld a metal frame in the form of a vase, with a height and width of not more than 2 meters and install it in the place where the tree will grow. The frame is a ring of a meter diameter from the bottom, from which metal curved pins (6-10 pieces) go up, with imitating the shape of a vase.
From above, all the pins are welded together with the help of another metal ring, with a diameter of up to 2 meters. It must be installed thoroughly so that the frame does not squint or donkey over time.

If the frame of the bowl is made wider than 2 meters, it is advisable to insert the support ring in the middle so that the structure holds well in shape
Stage 2. Planting a seedling
Work order:
- In the center of the lower ring of the frame, a tree is planted. This should be done in the fall, so that the plant takes root by spring.
- The seedling should be annual and grafted onto a dwarf stock.
- In early spring, cut off the entire top of the seedling, leaving only 30 cm of the trunk.
- Deprived of the central conductor, i.e. the top of the tree will give an increase in lateral shoots. Of these, only the top ones are left, the number of which should be equal to half the number of metal pins of the frame. If you have a vase of 10 faces, leave 5 branches, if out of 6 - 3. They are given the opportunity to grow freely.
- The remaining branches are cut into a ring.
- All next summer, they monitor the growth of the main apical shoots. So that the branches have the same thickness, you can adjust the power by tilting them in different directions. If the shoot is frail, straighten it as vertically as possible and fix it to the frame. If it stands out too thick from the rest - bend horizontally to stop the movement of juices.
Stage 3. Forming the base of the wood bowl
Deprived of the central conductor, i.e. the top of the tree will give an increase in lateral shoots. Of these, only the top ones are left, the number of which should be equal to half the number of metal pins of the frame. If you have a vase of 10 faces, leave 5 branches, if out of 6 - 3. They are given the opportunity to grow freely. The remaining branches are cut into a ring.
All next summer, they monitor the growth of the main apical shoots. So that the branches have the same thickness, you can adjust the power by tilting them in different directions. If the shoot is frail, straighten it as vertically as possible and fix it to the frame. If it stands out too thick from the rest - bend horizontally to stop the movement of juices.

To clearly trace the beautiful shape of the trunk, all lateral shoots must be removed in a timely manner, leaving the stem completely clean, devoid of branches
Step 4. Creating a wireframe from branches
During the year, the skeletal apical branches become stronger, so in the spring they are deeply pruned, leaving only a small part with two buds. The rest is deleted.
From two buds new shoots will grow, which will become the faces of the bowl. Each shoot as it grows is fixed on the pins of the frame to give it a strict vertical position. You just have to follow the development of the tree, cut the side shoots on the main skeletal branches. Leave 3-4 shoots on each tree “face”, cutting off their tops to the level of the second from the beginning of the leaf. Fruit buds will begin to form on them, and over time, your vase will be covered with juicy fruits.
When the main branches reach the upper points of the supporting frame and become lignified, you can remove the metal structure. From now on, the tree itself will keep the given shape, and you just have to thin out the extra shoots and restrain the growth of the tops so that the sculptural effect is not lost.
Multi-tree structures
It is quite simple to create sculptural compositions from several trees. For example, a spiral of stunning beauty can be created from 4 willows or birches. And this is done simply:
- Cooking frame. It is necessary to weld a metal frame in the shape of a cylinder. The cylinder consists of the same rings bottom and top (up to 2 meters in diameter), and four pins between them. The pins should be welded at the same distance from each other. Then a thick wire is wrapped around the pins, starting from the bottom and winding it onto the frame with a spiral at an angle of 40-45 degrees. The distance between the spiral rings is 35-40 cm.
- We plant and cut trees. Then 4 annual trees are planted on the outside of the structure at the points where the support pins go up at the frame. The trunks are fixed to the pins so that they develop strictly vertically. Skeletal branches leave only those that are at the level of the passing spiral, and tie them to the wire. The rest is removed onto the ring. On a trunk 2 meters high you should get about 5 branches each. In which direction to direct them - see the suppleness of the shoot. Where he himself is leaning easier, there and fix. Gradually, the branches wrap around a wire spiral, and after 2-3 years they will become lignified. Remove shoots departing from these branches so that they do not weaken the growth of the main branches.
When the whole spiral is closed by branches, and they become thick, the wire is removed and the frame is taken apart. The resulting woody spiral will certainly stand out in the landscape, causing envy among others.

The lower support ring of the frame can not be done if the side pins are driven deep into the ground so that they hold firmly
As you understood from the instructions, becoming a sculptor in your own garden is very simple: you just need to have the desire and a good welder at hand who will make the supporting frames.