Living in your own home beyond the city limits attracts many: fresh air, the absence of the usual fuss and, of course, physical labor, which brings certain results. It does not matter what exactly you will grow on your site. You can restrict yourself to just flowers. When you hold in your hands a banal cucumber, which you yourself have grown, you experience an unusual feeling of pride and joy from unity with nature. And you know for sure that you created a clean product. Gradually, the idea arises whether to get chickens or rabbits. For rabbits, for example, you can build a rabbitry with your own hands. But first think, are you ready to keep these animals?
Pros and cons of rabbit breeding
The benefits of rabbit breeding are obvious:
- Meat. Rabbit meat is a dietary product useful for people of all ages. It contains a set of amino acids that contribute to the synthesis of protein in the human body. In addition, it is a low-calorie and natural food.
- Liver. Suppose that in one animal contains only 100 grams of the liver, but this is a real delicacy.
- Skins. Dressing hides requires not only additional time and knowledge, but also special preparations. Not the fact that they will want to spend their time searching and using them.
- Bones and other waste. These products can be boiled and, in the form of a stew, given to the dog.
- Manure. In quality, this manure is superior to pig and cow, but inferior to horse. In spring and autumn, it can be added to the soil, and it will answer you with a glorious harvest.
- Communication. Even a simple contemplation of these cute pussies gives a lot of positive emotions.
But in the last paragraph of the advantages there is already a catch. The disadvantages of rabbit breeding are also worth telling:
- Slaughter. Yes, rabbits will have to be killed. Even if this is a medium-sized household, it does not make sense to hire someone to carry out this work.
- Mortality. These animals are often sick and rarely cured. Especially in the summer, when an epidemic wave sets in.
- Accommodation In this article, you will read how to make rabbitry yourself, so this problem can be ignored.
- Food. What horrible these picky animals will not be. They eat up to 30 times a day, but more often they just spoil food and drink, mixing with waste. Conclusion: there should be a lot of high-quality feed.
- Reproduction. Despite the theoretical fecundity of these animals, in practice there may be many offspring, but may not exist at all.
- Breed. To maintain the livestock level, a change in the male producer is required once every six months.
Here are the main disadvantages of rabbit breeding. If you add to them the laborious cleaning, the fight against rodents and the daily presence of owners in the regime of caring for pets, it becomes clear that rabbit breeding is not an easy task. If such prospects are not scary, let's talk about the placement of animals.

Rabbit meat is good for the elderly, and for children, and even for patients: this is a real low-calorie diet product

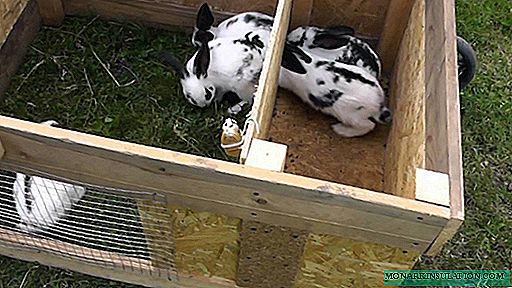
Killing a rabbit is not so simple: you get used to these animals, but there is a way out of the situation. You can breed decorative rabbits for sale
Planning the future livestock
How to build a good rabbitry without knowing how many individuals will live in it? If you just want to get animals "for testing", one rabbit with a litter is enough. They easily cost 1-3 cells in the area. For the meat to be regular and uninterrupted, you need 20-30 individuals of different ages of various categories.

To get started, you can get some rabbits and look after them during the warm season to determine how much this activity fits your plans.
Optimal rabbitry size
There are recommended cell sizes for rabbits. Here we will focus on them.
How to contain a pair?
If it is necessary to place two adults, it is enough to build a two-section room. Design Parameters:
- length from 140 cm;
- width within 60-70 cm;
- height from 50 to 70 cm.
Bunker drinking bowls and feeders are placed along the edges of the structure. So it will be more difficult for animals to climb in their paws. An inclined net is placed between the sections into which hay can be placed. This internal construction is called the sennik. To save space on the site, rabbitry can be arranged in two tiers. In addition to compactness, this design allows you to quickly add feed to animals and speeds up the cleaning process.

A small cage of two sections is perfect for keeping a pair of rabbits: there is everything necessary for them in this building
Group maintenance of young animals
A room for young animals is being built, focusing on the following parameters:
- length about 200 - 300 cm;
- width up to 100 cm;
- height in the range from 35 to 60 cm.
For young individuals whose age does not exceed 2 months, it is necessary to calculate the actual cell volume based on the total number of animals. One such rabbit needs a minimum area of 0.12 m2.
Female and her offspring
To place a female with offspring, at least 0.6 m2 of area is needed. For newborns, rabbits are placed in a cage with a special nest box, which should have the following parameters:
- length 35 cm;
- height 30 cm;
- width 25 cm.
In such a box, the mother and her rabbits will feel relaxed.

The simplest nesting box looks like this, it's easy to build it. You can put hay or sawdust inside to make the kids feel comfortable
What building material should be used?
The construction of rabbitry requires a relatively inexpensive, but durable material. Keep in mind that for all your mercy, your future pets are rodents. And this means that they will definitely try any construction for a tooth.

Rabbits are rodents, therefore, internal bars made of wood must be protected from their encroachments. It’s easy to make tin protection
If you want those parts of the frame that are made of wood to last more than one season, cover them with metal. In order not to buy it specifically, for these purposes, you can adapt the tin from beer cans or galvanized steel for roofing. These additional works will take not so much time, but the useful life of the cells will increase by ten, or even more.
The most inexpensive and simple material for the frame is wood bars, the cross section of which is 50x50 mm. Wood should not be impregnated with an antiseptic. This impregnation is toxic enough to poison young animals. Dry the frame well. This increases its durability.

Rabbitry with a frame of well-dried wood can be considered the most economical design: it will last you more than one season
For the roof of each tier of the structure, it is necessary to take moisture-resistant material. Flat or wavy slate is perfect for this purpose. If the structure will be on the street, do not take metal for its roof. This material has the unpleasant property of being very hot in the sun. As a result, the cell will actually turn into an oven.
Now you need to choose the material for the skin of the frame. For this purpose, a galvanized mesh netting, the cell size of which is 20x20 mm, is best suited. By the way, the chain-link itself got its name from the word "rabbit", pronounced in English.
For the side of the structure, its doors and facade use a steel mesh. The compartment for laying hay - the sennik, located between the sections, must be made of mesh, the cells of which have a size of 50x50 mm. This makes animals easier to get to the food they need.
For the bottom, a flat galvanized mesh with cells of 25x25 mm or 10x25 mm is used. Its laying is carried out on supporting wooden slats. This solution allows you to do the cleaning much faster. Through fairly large cells, the feces of rabbits simply fail. It does not adhere to wood or to a galvanized surface, which would have to be scraped off each time. The accumulation of manure occurs either in a special receiving hopper, or on the ground if it rolls along the inclined surface of the roof of the lower tier of the structure.
As a rule, solid rabbit flooring is not used. The reason is that the wood immediately absorbs caustic urine, and the stool simply sticks to it. As a result, the microclimate in the cell deteriorates, and the boards begin to rot quickly. Therefore, the bottom is best done trellised. To do this, planed floor bars are used. The gap between adjacent bars does not exceed 1 cm.

In this photo, the rack floor is clearly visible, each rack is reliably protected from rodent teeth by small strips of metal
Rabbits do not tolerate drafts and can get sick. To prevent this from happening, the back wall of the structure is deaf. To create it, you can use polycarbonate, boards, plain plywood or an OSB board.
If the structure will be on the street, its supporting frame is made of metal. So, the supporting structure is welded from a corner with parameters of 45x45 mm. After that, it is simply filled with finished sections assembled from a stamped mesh. It is necessary to fix the grid on the framework welded from a steel bar. Another option is a wooden frame. How to make it, read below.
You need to know that animals can have corns on their feet, they bring suffering to the animal. To prevent this from happening, you can install a small plywood sheet on the floor that protects the paws. But such plywood must be periodically removed, cleaned and thoroughly dried.

An element such as plywood is needed only in those cells whose floor is completely made of flat netting. It is necessary so that rabbits do not appear corns
The net cannot protect animals from rain or snow. Such a cage is best placed under a canopy of slate or in a barn.
A little about the Zolotukhin method
Nikolai Ivanovich Zolotukhin has been breeding fur-bearing animals for many years, has studied their habits well and, summarizing his experience, has created his own method of effectively equipping rabbitry.

The combined floor looks exactly like this: a slightly sloping large solid front part and a mesh of 15-20 cm wide at the rear wall of the rabbitry
Zolotukhin offers:
- Make the floor combined: its front part will be in the form of an inclined flooring made of flat slate, and the back should be made of steel mesh;
- The feeders, in which the grain is poured, are made not just bunker, but of a rotary structure: in this case, it will be easy not only to fill them, but also to clean them.
Such a non-standard floor surface was chosen by Zolotukhin not by chance, but on the basis of reliable statistics and his own observations. Approximately 95% of the rabbits have little need at the back wall of the cage. Just where the grid is. 70% of feces get there. Animals spread the rest of the feces all over the floor, but it is dry, so sweeping it out is much easier.

A simple rotary feeder from Zolotukhin differs from the usual bunker in that it can be deployed by slightly pulling on itself
The litter, which would absorb moisture, Nikolai Ivanovich uses only to teach young animals to urinate at the back of the room. Its buildings are always dry, and he has to spend less time on cleaning than others. See the video in detail about the Zolotukhin method.
Getting to the construction of rabbitry
In order to accurately calculate the consumption of materials required for rabbitry device, you need to either use a ready-made drawing or make your own sketch based on the sizes proposed above. After purchasing the material, you can begin to work.

This is a drawing of a two-tier two-section cage in which four adult rabbits can be kept. It is equipped with an intersectional sennik, drinking bowls and bunker feeders
If the frame is wooden, cut into the size of the slats and connect them using self-tapping screws. Be sure to make sure that there are no distortions. To do this, check the level with horizontal surfaces, and with a square - vertical. First we assemble the front and rear frames. Now, using short jumpers of the ceiling and floor, we connect them into a single design.

If you look at the rabbitry from the side, you can clearly see how to make its roof so that it is inclined
The frame is ready. Now install the bars of the sennik and doors. We lay the rack floor, not forgetting that the gap between its elements should not exceed 10 mm. After completing this work, we cut the grid and plywood to attach them to the frame with self-tapping screws.
Now we are roofing. For the first level of the roof, you can use a moisture resistant sheet of QSB. We cut it so that the edge of the sheet 10-15 cm protrudes beyond the dimensions of the cage. For the construction of the second tier we take a wavy slate. It is attached to the inclined bars of the frame itself.
It remains only to install doors from the OSB plate, drinking bowls and hopper feeders. The work is completed. Watch the video, it will help you in your work:
All-season version with insulated compartments
Another rabbitry, this all-season, is represented by a master who made it with his own hands. Below we provide a drawing of the structure and a video made by the author himself.

Another version of rabbitry, this time it is equipped with warm compartments, which helps fluffy animals successfully survive the cold and bad weather
Video clip with instructions: