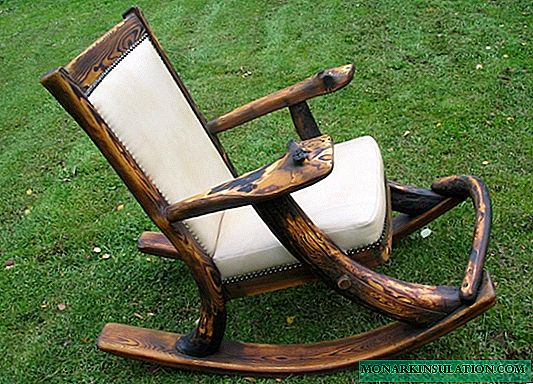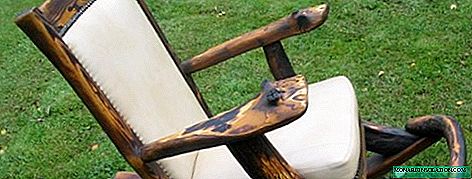
Private garden is a great place for work and leisure. For a full-fledged summer vacation, people came up with a variety of devices from a swing to a hammock. A classic item of comfortable furniture are chairs. But someone ingenious managed to make an addition to his design that made it even more convenient: a rocking chair was born. This model allows you to perfectly relax all the muscles, and unhurried and rhythmic swinging leads to pleasant thoughts, calms, lulls. The rocking chair has been so popular that since its invention many variations and modifications have appeared. Moreover, it turned out that a do-it-yourself rocking chair made of different materials is not a myth.
Popular models of rocking chairs
To create a classic rocking chair model, you will need a willow vine. Openwork and lightweight design looks great against the background of country greenery and successfully combines with the interior of a garden house or gazebo. There is only one drawback of this lightweight and durable product - the fear of excess moisture.

Making a light and seemingly simple chair out of willow vines is not so simple. You need to be able to prepare the material, and the weaving technique requires special skills
Rattan is a flexible vine that grows in Southeast Asia. Wonderful and very beautiful chairs are also woven from rattan. In beauty, they are not inferior to willows, which can not be said about strength. No screws or nails are used to create rattan furniture. All joints hold only thanks to glue and skillful knitting.

Rattan as a raw material is not sold in our stores. Such a rocking chair for the owner of the cottage is a successful purchase, and not a product in the manufacture of which he can show his creative abilities
If we talk about the strength and durability of the product, then this model created from forged metal can be an example of reliable furniture. An elegant lace structure will decorate any garden.
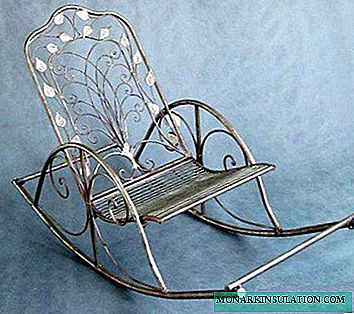
The main advantage of this model is its durability. The main, but not the only one. Agree that this thing looks like an elegant silver jewelry
Rocking chairs are used not only as country furniture. A distinctive feature of the office rocking chair is its respectability and solidity.

Office workers also appreciate high-quality rocking chairs as accessories that help to fully relax from the hustle and bustle of business. Of course, office models are different from the cottage option
There are also design models of rocking chairs made in the high-tech style.

Very interesting and, most importantly, quite functional model. Combines a comfortable rocking chair and directional light
Some ultra-modern designs of rocking chairs are truly unique. Like simpler models, they guarantee their owner comfort, but, in addition, independence from energy sources. Such a product, equipped with solar panels, allows you to spend time with comfort and benefit.

For the foundation of this design, you can use thick plywood, and for its upper part - polycarbonate. Finding solar panels online is no problem either.
Master class: rocking chair for two
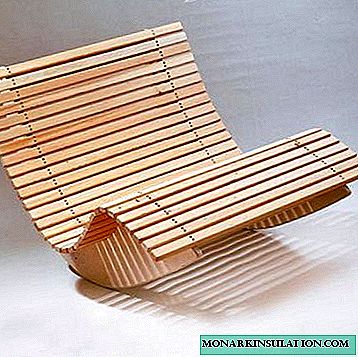
A double rocking chair looks more like a sofa. If you put a few pillows or throw a blanket on this convenient structure, you simply can’t find anything better for a summer vacation. We will tell you how to make such a rocking chair with your own hands.

Who said that you can enjoy the comfort of a rocking chair alone? This model is good for two
Stage # 1 - Preparing Tools
Making a high-quality rocking chair is not as difficult as it seems. Having all the necessary tools and stocking up with high-quality materials, you can slowly do everything yourself. What kind of tools do we need for this work?
- Electric jigsaw complete with wood files.
- Disc grinder. It will need nozzles with different grit. Actually, a manual milling cutter may also be needed, but if there is a large amount of coarse-grained emery paper and provided that the grinder has sufficient power, you can do without it.
- A screwdriver with a set of wood drills and bits.
- A right angle with a long ruler.
- Roulette.
- Hammer.
- Putty knife.
- Brushes and pencil.
Proper organization of work assumes that all of these tools will be literally at hand.
Stage # 2 - draw a drawing
Any responsible work begins with the manufacture of the drawing. It is necessary in order to correctly calculate the need for materials. However, the drawing is already there. On a metric grid, the step of which is 100mm, there is a template for the side of the chair. It is best to transfer the drawing to the paper and cut out the pattern, with which it will be easier to draw a contour on the plywood.
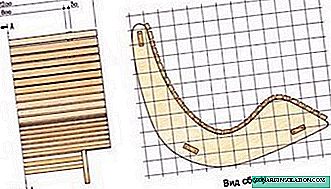
A drawing of an excellent rocking chair, which can be done with your own skillful hands, is made on a metric grid, the step of which is 100 mm
Small inaccuracies are permissible, it is important not to make a mistake in the main thing: the sidewalls must be identical, on the rolling, lower side there should not be any protruding corners.
Stage # 3 - cutting blanks from plywood and timber
For the manufacture of screed-tsar and sidewalls, eurofaner is required, the thickness of which is 30 mm. The sides, as has already been said, are cut with a jigsaw strictly according to the pattern. The dimensions of each of the three tsars are 800x120 mm.
Now you need to cut the blanks of the bars, which will subsequently make up the surface of the seat and back of the rocking chair. For this we need a beam 50x25 mm in size, from which we will cut 35 pieces of 1200 mm each. Before you buy the necessary material for this, find out what is the standard length of one such bar in your stores.

Based on the proposed drawing, you need to make a pattern, with which you need to draw a contour of the sidewall of the chair on plywood
The total moldings that you need, you can easily calculate yourself. Observe the multiplicity so that when cutting workpieces there is not a large volume of residues. Let your rocking chair be a little narrower than originally planned. For example, with a standard length of 2.4 meters, the length of one workpiece will be 1195 mm (the thickness of the cut and the subsequent processing are subtracted).
With fasteners, everything is simple. Are needed:
- confirmations (Euroscrews) 12 pieces, size 5x120mm;
- 140 screws, size 4x45.
In fact, the initial part of the work is already behind, but still have to work hard to get the desired result. In the process of this work you will need drying oil, varnish for wood, putty, antiseptic, which also need to be bought in advance.
Stage # 4 - Pretreatment of Parts
We proceed to sanding all the details and removing small chamfers. If your grinding machine is powerful enough and you know how to handle it, such a procedure will not take you much time. Given that the rocking chair will be on the street, special attention must be paid to the ends of all elements in order to protect them as much as possible from the dampness that they will undoubtedly be exposed to.
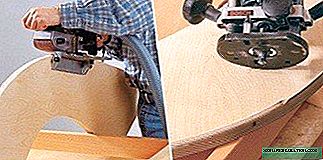
Preliminary processing of parts consists not only in sanding and chamfering. All measures must be taken to protect the end parts of the elements from decay.
The ends of the parts must be impregnated with hot linseed oil, and the wood fibers on them are slightly flattened with a hammer. So moisture will be absorbed less. For the ends, the treatment-varnishing-treatment procedure should be carried out twice before the general assembly of the structure.
Stage # 5 - assembly of the structure
There are no specific standards for the manufacture of this piece of garden furniture. The holes for the drawers are marked out as logic requires: the head, the middle part of the outer arc of the sidewall and the foot. The tsars will be pulled to the sidewalls with the help of confirmations. To do this, preliminary markings are made on the sidewalls, after which the two sidewalls are combined, and a through hole is drilled in their planes with an 8 mm drill. For a hole in the end of the tsar, a 5 mm drill is used. Now you can tighten the frame of the chair using Euroscrews.

The holes for the drawers must be pre-marked, after which both sides are folded together and drilled through holes are neat
Now let's talk about how to drill the bars forming the seat and back of the chair. We have exactly 35 of them. It is necessary to drill 4 holes in each bar (two on each side). And this is 140 symmetrical holes.
To simplify the task, we use a "conductor" - a device for marking a large number of homogeneous parts. We make it very simple: we take a piece of the same beam, not shorter than 250 mm, drill holes for a template in it, the diameter of which should be the same as for a marking pencil. From the end and one of the side parts of the "conductor" we beat the scraps of plywood, which will serve as a limiter that does not allow to miss in the process of marking. The "conductor" is ready.
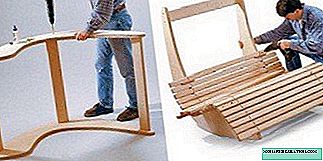
Assembly is the longest and most laborious part of creating a rocking chair. However, the "conductor" will help you facilitate the procedure of drilling symmetrical holes
This is how the chair looks at the final stage of work. Of course, in this form it still cannot be exploited. It is necessary to take measures to protect it from the weather.
The "conductor" will be used to mark holes, it is impossible to drill through it, because you can break pattern holes with a drill and you will have to drill the parts separately. If you take a 3.5x30 drill with a vertical drill, it will be possible to make the hole as needed according to the finished marking.
According to the drawing, there should be a gap of 15 mm between the bars. In order to avoid distortions, it is necessary to mark the distance on the side of the chair, which will correspond to six bars together with intermediate intervals, and check the matching of the template inserts in thickness. If they match, you can continue to fasten. Otherwise, an adjustment should be made. A four-millimeter wood self-tapping screw is excellent in eurofan. But given the fastening frequency is high, it is better to use a three-millimeter drill.
Stage # 6 - finishing of the finished product
The holes above the screws must be carefully putty. The next in line will be antiseptic treatment and a three-time coating of the product with waterproof varnish. Work must be very diligent. Remember how much your work has already been put into this chair. After all, do you want it to last as long as possible? Try hard then!

If you have small children, you can involve them in the work of filling putty holes on the screws, but you will have to examine the model carefully for damage to fix it yourself
Sliding chair without runners
You probably noticed that all of the above models have a common principle of operation. The trick is that bent skids are used as the base for these rocking chairs. How to make a rocking chair without runners? It turns out that there is such an opportunity. Watch this video and you’ll get an idea of exactly how this is done.