Autowatering for indoor plants will maintain the moisture level since the last irrigation procedure. This is not a panacea, especially since autowatering has its limitations. But in any case, this is the best way, both in terms of financial costs and ease of use, to create a small oasis at home.
Autowatering for indoor plants
There are several ways to organize automated watering. All methods described in this article are equally effective, but only if the period of operation of the irrigation system lasts no more than 12-14 days. These are the maximum periods for which you can leave plants without human supervision.
Autowatering for indoor plants
Attention! Despite the time limits for using the automatic irrigation system, some experts say that home flowers can easily withstand up to 1 month without standard watering. Therefore, even leaving for a long vacation, you can not worry about the condition of indoor plants.
Preparatory work significantly increases the degree of color stability to the upcoming regime.
Here are some practical tips:
- The last top dressing should be carried out no later than 2 weeks before switching to automatic watering mode. After fertilizing, plants need to absorb a large amount of liquid for the normal absorption of mineral substances.
- Three days before leaving the plants, buds, flowers, preferably part of the foliage, should be cut. With a large green mass, moisture evaporates too quickly. It is also worth checking the flowers for diseases and pests.
- To reduce the temperature and brightness of the light, plants must be moved inland. Tanks with flowers should be placed close to each other.
- Just before departure, it is recommended that a little more intensive irrigation be performed than usual. This will allow the soil to be well saturated with liquid. It is also recommended to cover containers with flowers with wet moss.
Flasks and enema balls
The flask for autowatering is a rounded tank filled with water, it has a tube tapering downwards, with the help of which the liquid is fed into the soil.
For reference: flasks for autowatering have external resemblances to an enema, so sometimes they are called ball enemas.
At the moment when the soil dries, oxygen begins to flow into the leg of the enema, which helps push the necessary amount of fluid. In general, "enemas" are a good option for irrigation, but they also have some disadvantages.
One of them is the uneven flow of water from the flask, which negatively affects the quality of irrigation. The tube is periodically clogged, so moisture gets to the rhizome worse. Sometimes water flows into the ground too quickly, and sometimes it stops altogether. Therefore, enemas can be used during departure, but this must be done very carefully.

Flasks and enema balls
Flower pots with autowatering
Pots with automatic watering are very simple and convenient to use. Their use provides subsurface, capillary irrigation. In one part of the container is liquid, and the second is intended directly for the plant. That is, it is a double tank or a pot equipped with a separator.
However, their device may vary depending on the manufacturer. For example, some have cone-shaped fluid reservoirs that are mounted in a pot and connected to a tube on the surface. The design of the other involves the presence of two vessels installed one in one and side for supplying fluid. Still others have a collapsible structure - the tank is equipped with a special separator, indicator tube and a reservoir with liquid.
On a note! The only nuance worth paying attention to is the mode of operation of the system. It begins to work only at the moment when the soil is sufficiently filled with roots, which are in contact with the drainage layer and “pull” the liquid from the reservoir.
If the plant has a small rhizome, then when planting it in a pot and filling most of the container with “empty” soil, you will have to wait until it grows and starts to “draw out” moisture.
When planting a young plant in a large container, you will also need to wait about 70-90 days (sometimes even more than 3 months) until the roots become large enough. Throughout this period, the smart pot can be used as usual, that is, to irrigate in a standard way. For this reason, smart containers are only suitable for adult flowers and those whose old pot is comparable in size to a new one.

Flower pots with autowatering
Capillary mats
An autonomous irrigation system can also be created using capillary mats. They are made of a material that absorbs liquid well.
Here is what you need to organize this system:
- Prepare two pallets.
- Water is poured into a large container.
- Then loading the pallet (smaller) with a perforated bottom.
- A mat is placed in the second pallet, and plants are placed on it.
In addition, you can make a table with rugs and place pots on top. The end of the mat should be dipped in a container of water. After the liquid begins to be absorbed, it will begin to move directly to the roots of the flowers.
Granular clay or hydrogel
To automate irrigation, you can also use hydrogel or granular clay. They are good in that they are able to perfectly absorb moisture and give it to plants, and the process of supplying liquid occurs gradually, which has a positive effect on the condition of home flora.
In order to set up an automatic watering system for domestic plants, you need to:
- Choose a capacious container.
- Pour in a pot of hydrogel or clay (layer).
- Put a flower upstairs (rhizome does not need to be cleaned of an earthen coma).
- The void between the walls of the tank and the soil must be covered with the remainder of the product and covered with a plastic film.
This method of watering can be used for a rather long period. It also eliminates the need for frequent plant transplants.
Attention! If there are signs of drying of the hydrogel or clay, a little water should be poured into the container with the flower.

Granular clay or hydrogel
Ceramic cones
Particularly popular was the system that provides for the use of ceramic cones. It is also sometimes called the carrot system.
This device is stuck in the ground, and the tube that leaves from it is placed in a container with liquid. In itself, the process of pumping water does not need external control. At the moment when the earth begins to dry out, the pressure acting on the vessel provokes the flow of fluid.
Important! Despite the fact that most manufacturers declare the high reliability and quality of their devices, experience shows slightly different. The fact is that carrots are prone to frequent clogging, so the right pressure is not always formed in the container.
Finding the right place for the vessel with water can cause some problems, because when installing the tank on a platform too high, the flower can simply be flooded, and if it is set too low, the liquid will not reach the plant at all.
If it is very difficult to find a place near the plant to install a reservoir of liquid, then you can use a ceramic nozzle on the bottle. To do this, install the nozzle on a regular plastic eggplant filled with water, and insert it into a container with flowers.
Wick System
Another easy way to autowire is to pump water using the rope from which the wick is made. One of the ends of the rope is placed in a container with liquid, and the other is brought to the plant. The lace, absorbing moisture, directs it directly to the flower.
On a note! For convenience, the wick is sometimes fixed on the surface of the soil or installed in the drainage hole of the pot.
For the irrigation method to be effective, you need to use a synthetic rope that absorbs water well. Natural cords will not work, as they quickly deteriorate.
The advantage of this system is that it can be adjusted. When the water tank rises above the level of pots with plants, watering will be more intense. If you lower it below, then the flow of liquid on the contrary decreases.
DIY automatic watering systems
If it is not possible to use the irrigation methods described in the previous sections, you can go a little different way and refuse to use ready-made solutions and devices that are attached to them. Even inexperienced people in this lesson will be able to do this without any problems. Moreover, in addition to standard methods, there are quite a lot of those that arose as a result of experiments by amateur gardeners and just people caring for home flora.
Let's look at some examples of do-it-yourself auto-irrigation systems for indoor plants.
Gravity irrigation
This method involves supplying fluid to the pot through a conductor.
To put this method into practice, you will need a cotton or polyethylene rope. One of the ends of the lace will need to be dipped in a bottle of water. A liquid filled container must be suspended or installed next to a flower. The free end must be immersed in the soil mixture.
This solution is great for taking care of indoor plants during the holiday season.

Gravity irrigation system
Watering from a plastic bottle
Watering using a plastic bottle is one of the cheapest and easiest ways to care for plants. It provides uniform watering and allows you to build an irrigation system in a fairly short time. However, it is also worth noting that you can use this solution only up to 4 days.
Watering is carried out as follows:
- Several holes are made on the lid. The more of them, the more intensive watering.
- The eggplant is filled with water.
- Then it needs to be turned upside down and deepened into the soil.
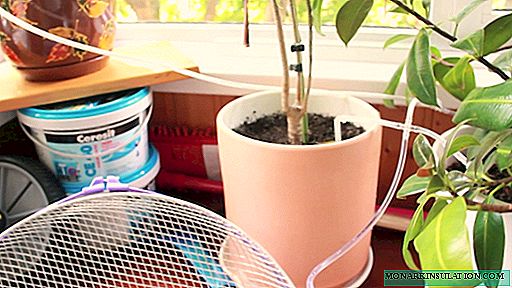
- Watering for indoor plants from a dropper
On a note! To build this system you will need several droppers (medical) and one 5-liter bottle. The number of colors should be commensurate with the number of droppers.
Dropper watering
To begin with, you should remove the tips from the droppers, and also make sure their integrity. If during blowing in one of the sides there are any problems, then the device must be replaced.
- So that the droppers do not float to the surface, they should be neatly tied and weighted with something.
- In a container placed on an elevated shelf, lower the bundle.
- Open the regulator on the tubes and close after filling with liquid.
- Insert the other end of the dropper into the ground.
- Open the regulator for watering.

Dropper watering
Malfunctions can occur during fluid transportation, so check the pots regularly for overflow or underfill. To do this, with the help of a regulator, the flow rate of the liquid is tested on each dropper.
Only when establishing the necessary water flow, the edges of the device can be lowered into containers with plants. Such a drip method will allow the plant to absorb liquid more efficiently.
There are quite a few systems and methods of automatic watering for indoor plants. It remains only to decide on the most optimal option, which will best meet the needs of home flora.